

For my first How to Draw Anime Characters tutorial, I’ll teach you how to efficiently plot and draw the head of any anime character.
Before we start off this how to draw anime characters tutorial, there are a couple of things that you’ll first need to remember. Most people tend to start drawing anime without any reference. A lot of times, people have this notion that drawing with reference means that you’re not good. On the contrary, the use of references will make you a better artist. So for this tutorial, think of an anime character/s you’d like to draw. Once you’ve settled on a character/s, get images of their heads in frontal, 3/4, and side views. Then as you’re drawing along, make sure to always refer to these images. For the purposes of this tutorial, I used Deku and Uraraka from the anime Boku No Hero Academia.
Another consideration with this how to draw anime characters tutorial is linework. One of anime and manga’s hallmarks is clean linework and mark making. This isn’t a tutorial for that. With that said, you can still sort of work on the quality of your lines through this tutorial.
With these out of the way, let’s now start with the tutorial.
Preparing the guideline
The first thing we’ll be doing is putting up a guideline. If you’re a beginner then it’s important that you use guidelines when drawing. No, using guidelines doesn’t make you less of an artist. In fact, you’ll find that it’s going to help you improve faster.
1. Laying out a grid

Unlike most guides out there, we’re not going to start with a circle. Instead, let’s lay down a rectangle (aproximately 3units by 4 units) like in the image below. Once we’ve laid down our rectangle, we’ll then divide it into four equal parts horizontally. We then follow this up with a line bisecting the rectangle right in the middle. Now we should have a rectangle divided into a total of 8 rectangles in 2×4 (column x row) formation.

2. Forming an ellipse
After laying down the vertical lines and the bisecting the , let’s then make a circle/ellipse to represent the skull. To do this, let’s set a point in the middle of the box formed by the first three rows. From here, draw a straight line on the x-axis that goes through the middle point and connects the left and right borders of the box. Do the same for the y-axis to then connect the top and bottom borders.

With this, we now have 4 points that divide our box into four quadrants. From here’s, let’s connect each point with a curved line until we end up with our ellipse.
3. Forming the jaw and chin
Now that we have our ellipse, let’s then get to drawing the jaw. For this, we’ll first need to vertically divide the bottom-most row of our main rectangle. We’re then going to make a diagonal line starting from each of the left and right side of the circle we made earlier. These diagonal lines need to go inward until they reach the line that we made to divide the bottom-most row of the main rectangle earlier. From these points, we’re then going to make diagonal lines that again point inward and converge at the point in the bottom most border of the main rectangle where made the vertical line in step 1.

4. Plotting the eyes, nose, and brows
So we’ve made our jaw and chin. This is great! Let’s now plot where the eyes are on our character. For this, let’s go to the horizontal line that separates our main rectangle in half. The line itself is divided in two but we’ll need to divide it further. Specifically, we’ll need to divide the line in 8 parts. The middle six of these parts (which we can condense to just 3) are then going to determine our eye placement. The left eye will fall under the left-most division while the right eye is going under the right-most. As for the nose, this will be under the middle division.

Eyebrow placement on the other hand, will depend on the artist’s style. In the case of Hirokoshi, it’s slightly above the middle horizontal line. Other artists though, will choose to place the eyebrows straight on the line itself.
5. The hairline and ears
Ears are relatively easy to place. The top-most part of the ear will always be in line with the middle horizontal line of our main rectangle. The bottom-most part of the ear as well as the nose will be in line with the top border of the fourth (bottom-most) division (or the bottom border of the third). As for the hairline, you just need to look for the bottom border of the first division (top border of the second). Take note though that the hairline is a lot like the eyebrows. Depending on the artist, they can be slightly higher up (or lower down) the border.

Let’s start drawing!
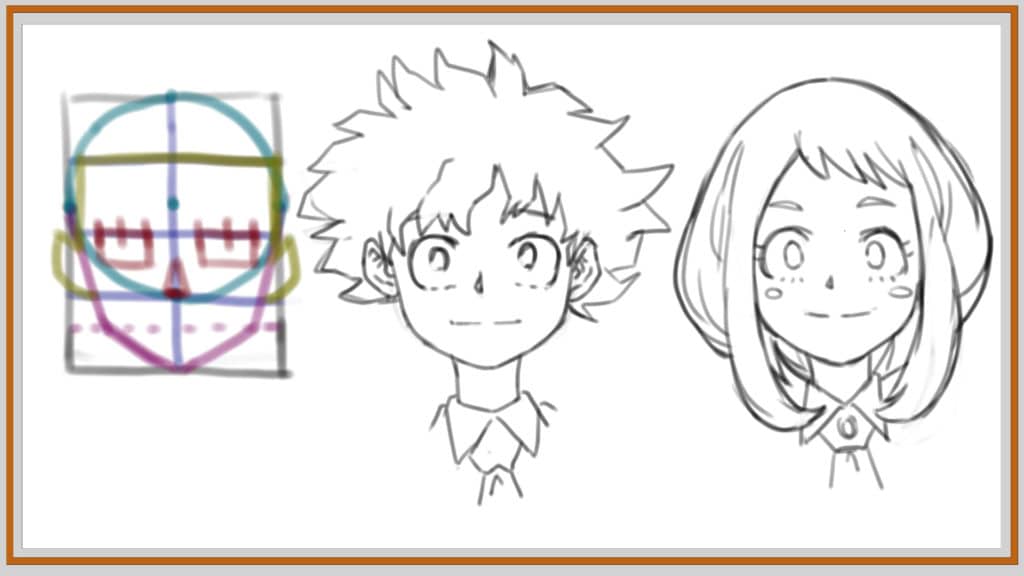
With the guidelines done, it’s pretty much just a matter of drawing your chosen anime character. For Deku/Izuku, the only real issue you’ll come across is the hair. I’d say that drawing anime hair is actually a lot more complicated than just drawing the facial features. As such, I’m going to tackle this in another tutorial.
Compared to Deku, Uraraka is a lot easier to draw. This is thanks to the simple design of her hair. In terms of their facial features, she looks very similar to Deku. Take note though that her face is much rounder. This is just how shape language is in anime. Girls typically have rounder and curvier designs. As for guys, their designs will tend to be more angular which denotes aggressiveness or masculinity.
In the next How to Draw Anime tutorial, we’ll be tackling head rotation and a little bit of perspective. As for questions or queries, go ahead and voice them out in the comments section below. Additionally, you can opt to check out our Contact page.
Can you do a tutorial on how to draw Bakugo and todoroki?